Making of… YogaNotes

I wrote a book called “Yoganotes — How to sketch yoga postures and sequences”. This article tells the story of how it came into existence.
The book is available English (www.yoganotes.net) and in German (www.yoganotes.de)
Finding Yoga
I started practicing yoga in 2013. I had worked with a personal trainer for about a year to get my body fit and healthy. This had resulted in quite a significant weight loss and a renewed joy in trying out different ways to move my body. There was a Sivananda yoga studio just down the road from our flat and I signed up for a beginner’s course. Since then I have tried lots of different classes, styles, and teachers.
A year later I visited India for the first time and found ‘my’ teacher, Surinder Singh, in Rishikesh. His way of teaching Hatha Yoga –focussing on the breath, on seeking stillness and going on an inward journey–, his kindness, presence and positive energy resonated with me and even though I only practiced with him for about a week that first time, I knew that I wanted to come back and practice with him for longer.

Entry from my travel diary after the first class with Surinder (more drawings from my travels: www.sketchnotesbook.com/notes-from-travelling-the-world)
The following autumn I returned to Rishikesh, did a 200-hour teacher training with Surinder and stayed for a few more months afterwards to keep practicing. During this time I first started to sketch yoga postures and sequences.

One of the first sequences I sketched. The stick figures are a bit stiff and awkward.
Coping with information overload
A month-long yoga teacher training is quite an intense time of learning, practicing and trying to digest a lot of very specific information about the human body and its movements. Sketching and visual note taking has been my way of making sense of and remembering new information for a long time, so I applied this strategy to yoga as well.


Above: Some of my sketchnotes from the teacher training course. If you are interested in my full sketchnotes from the teacher training, they are available as a book as well, either printed or as a PDF.
Besides making sketchnotes of the more theoretical topics like yoga philosophy and anatomy, I also started sketching the sequences of our daily asana practices. I wanted to remember the sequences for my own practice back home. Sketching out the sequences also had the nice side effect of helping me to understand the underlying structure of the classes, to see patterns in the sequencing and to form an understanding of the gradual evolution of the classes during the 4-week course. Visualising the sequences deepened my understanding of the practice and created a nice and easy-to-grasp summary of what we did every day.
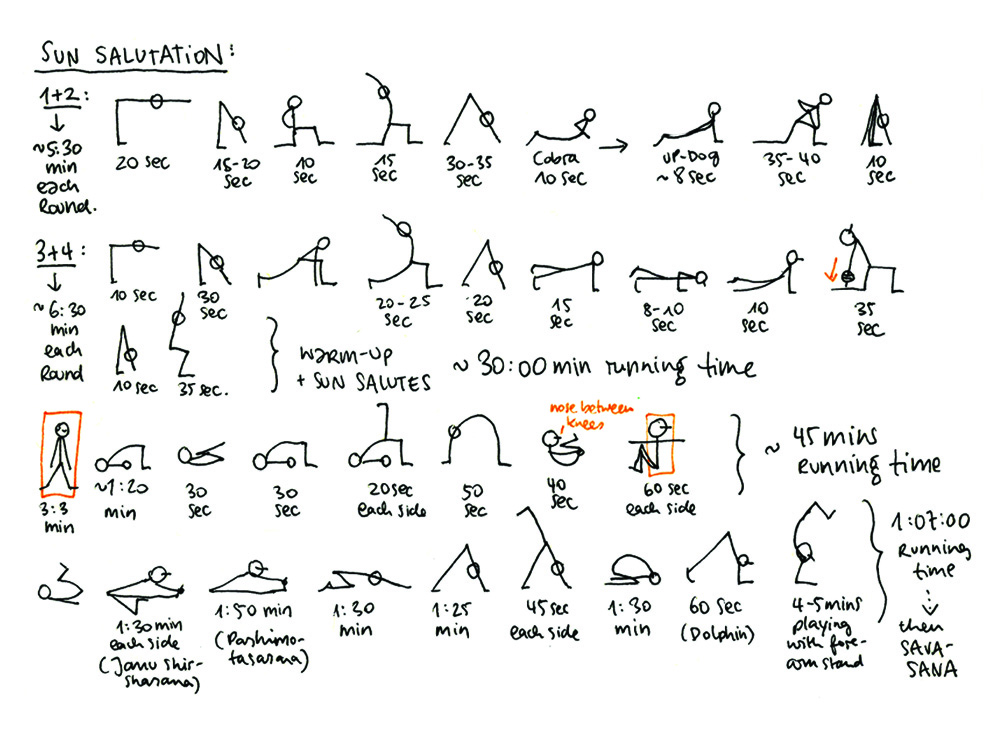
Experimenting with quite simplified stick figures
To sketch the sequences, I used simple ‘stick figures’ that are quick and easy to draw. These simplified little humans are great for expressing simple postures, but I soon ran into difficulties when trying to sketch more complex poses, where the body would twist and fold in different directions, where there was a lot of overlap of limbs or where there was simply no single perspective that showed all important aspects clearly.
Developing a system
As I love a challenge when it comes to explaining things visually, I decided to develop a way to sketch postures simply and quickly, but also precisely, so all the details of how to position the legs, feet, arms, and torso would be clearly visible in the sketch without having to add (too many) words.
I looked around on the internet to see if and how others tackled these problems. I found a quite few examples of other yogis’ sketches. Our sketches had a lot in common — including all the difficulties I had encountered in my own sketches.

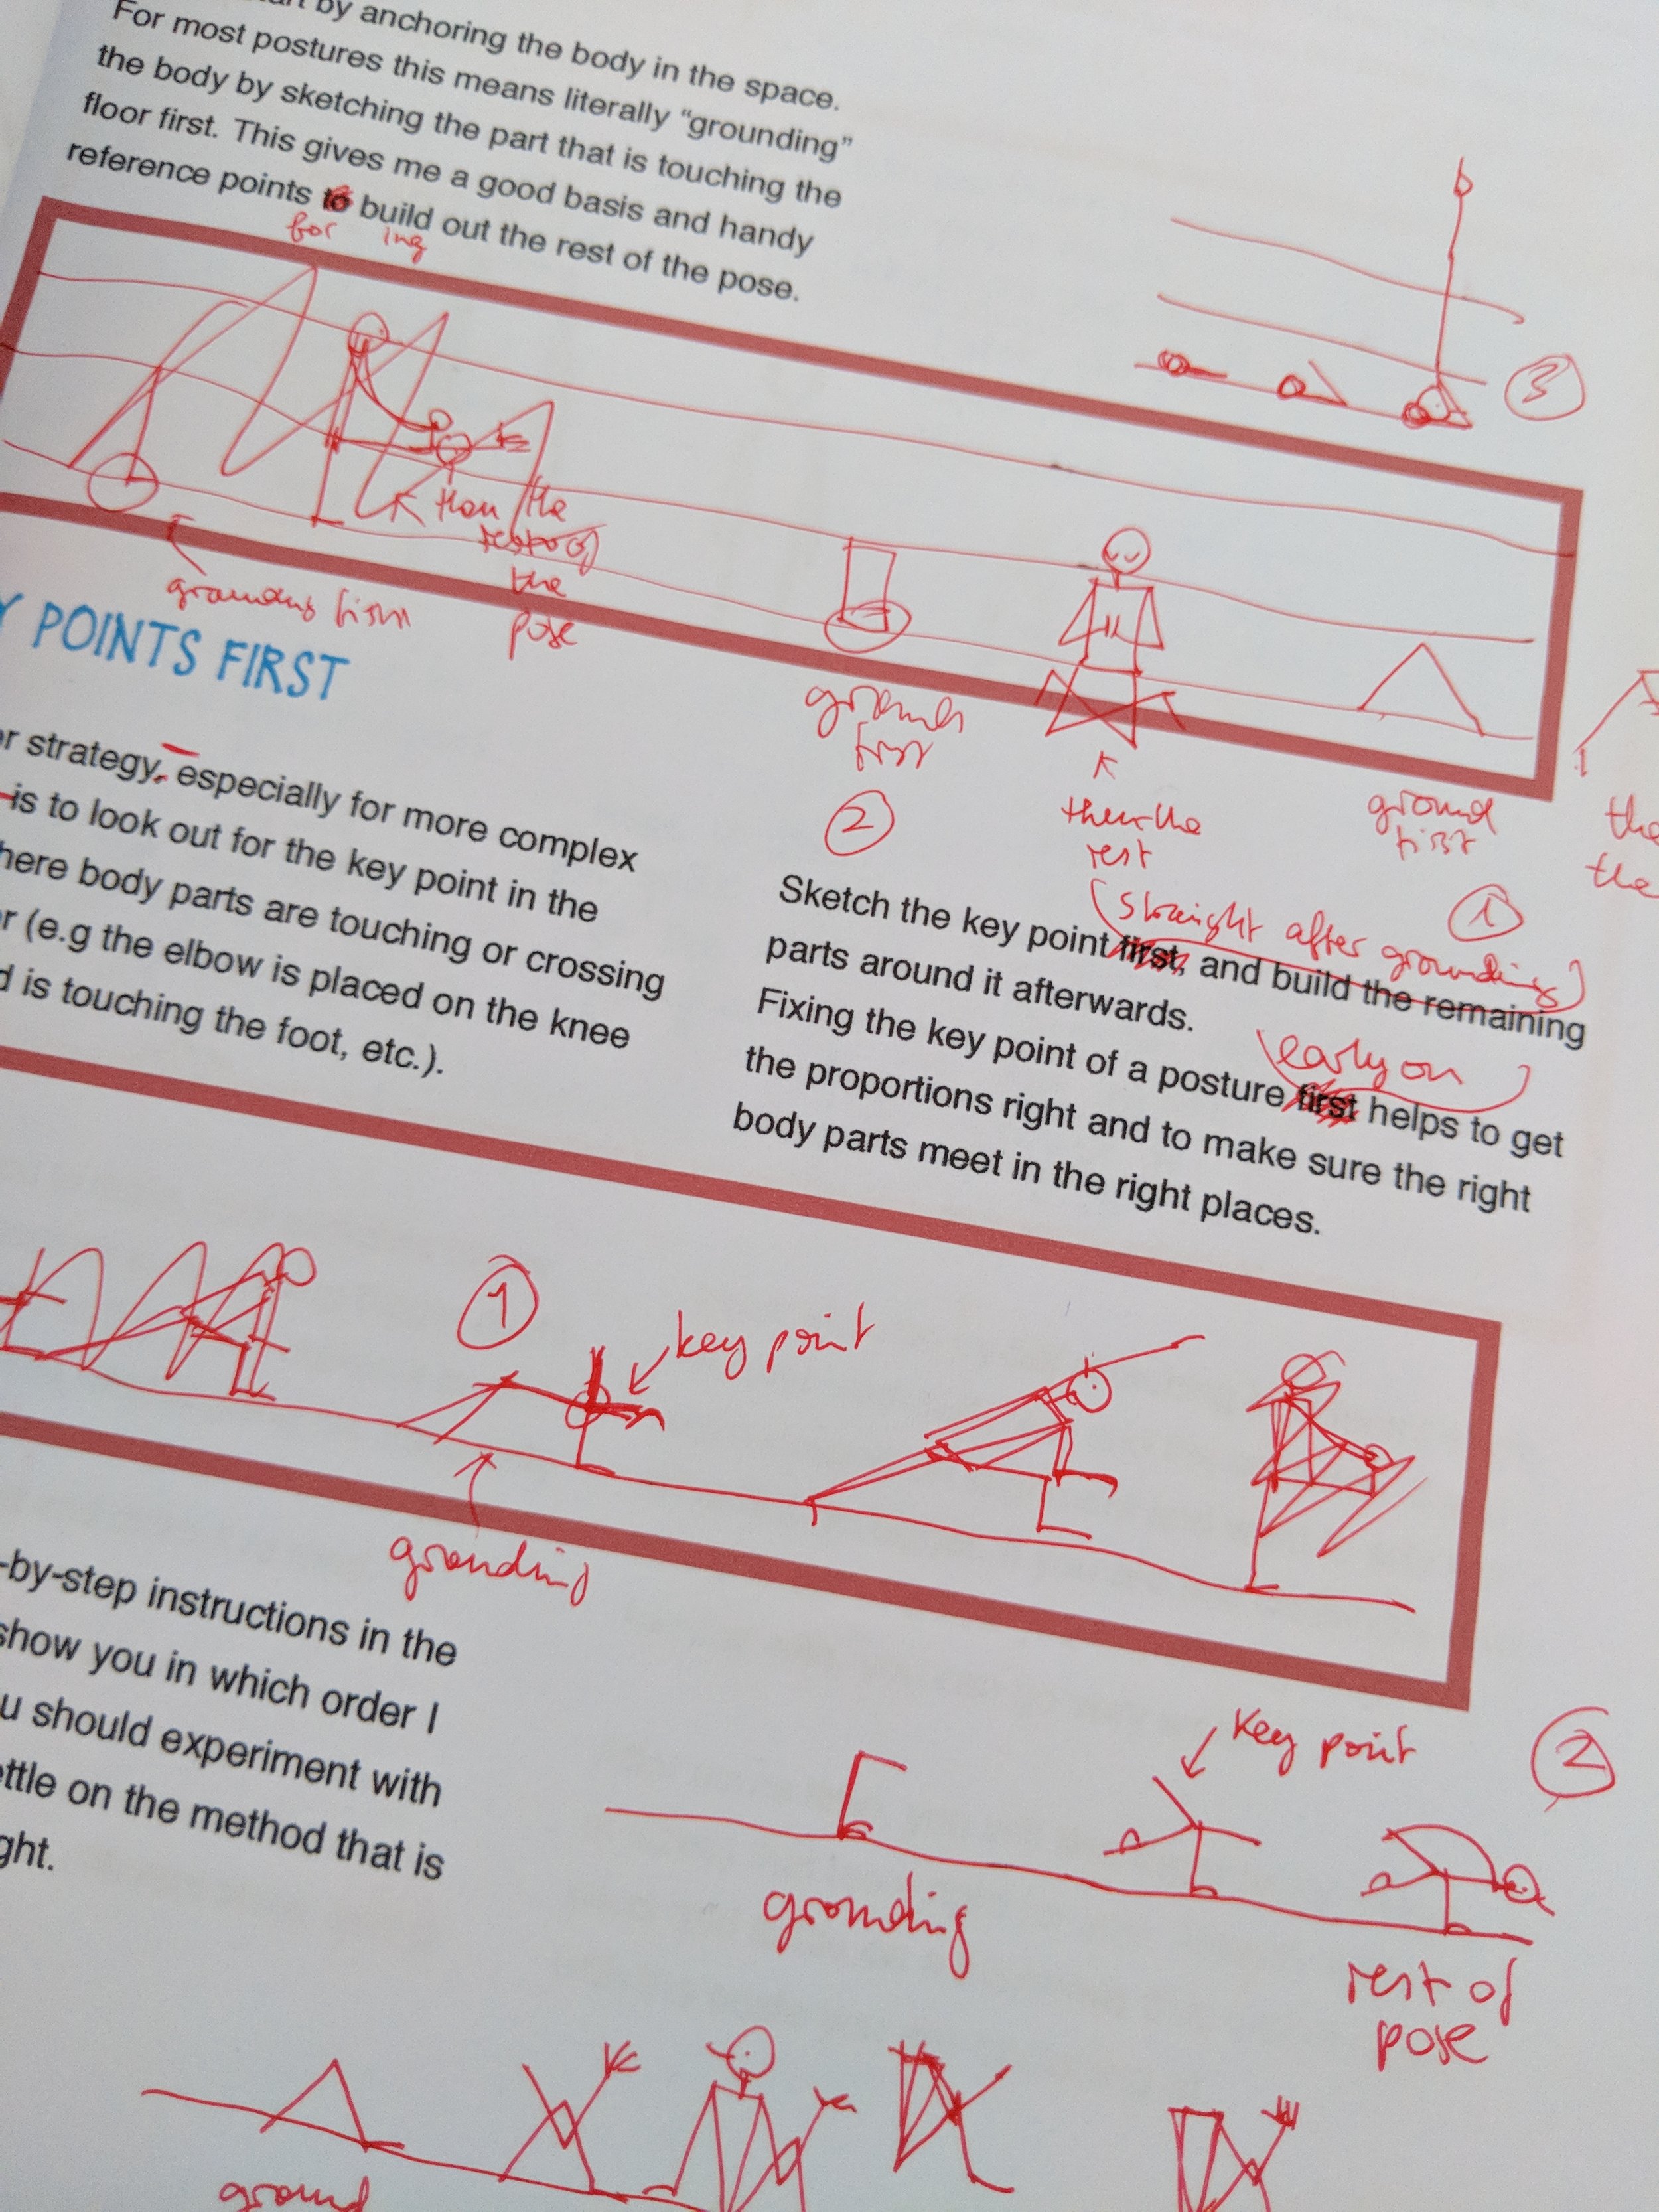
Thinking about how to optimise my sketching system
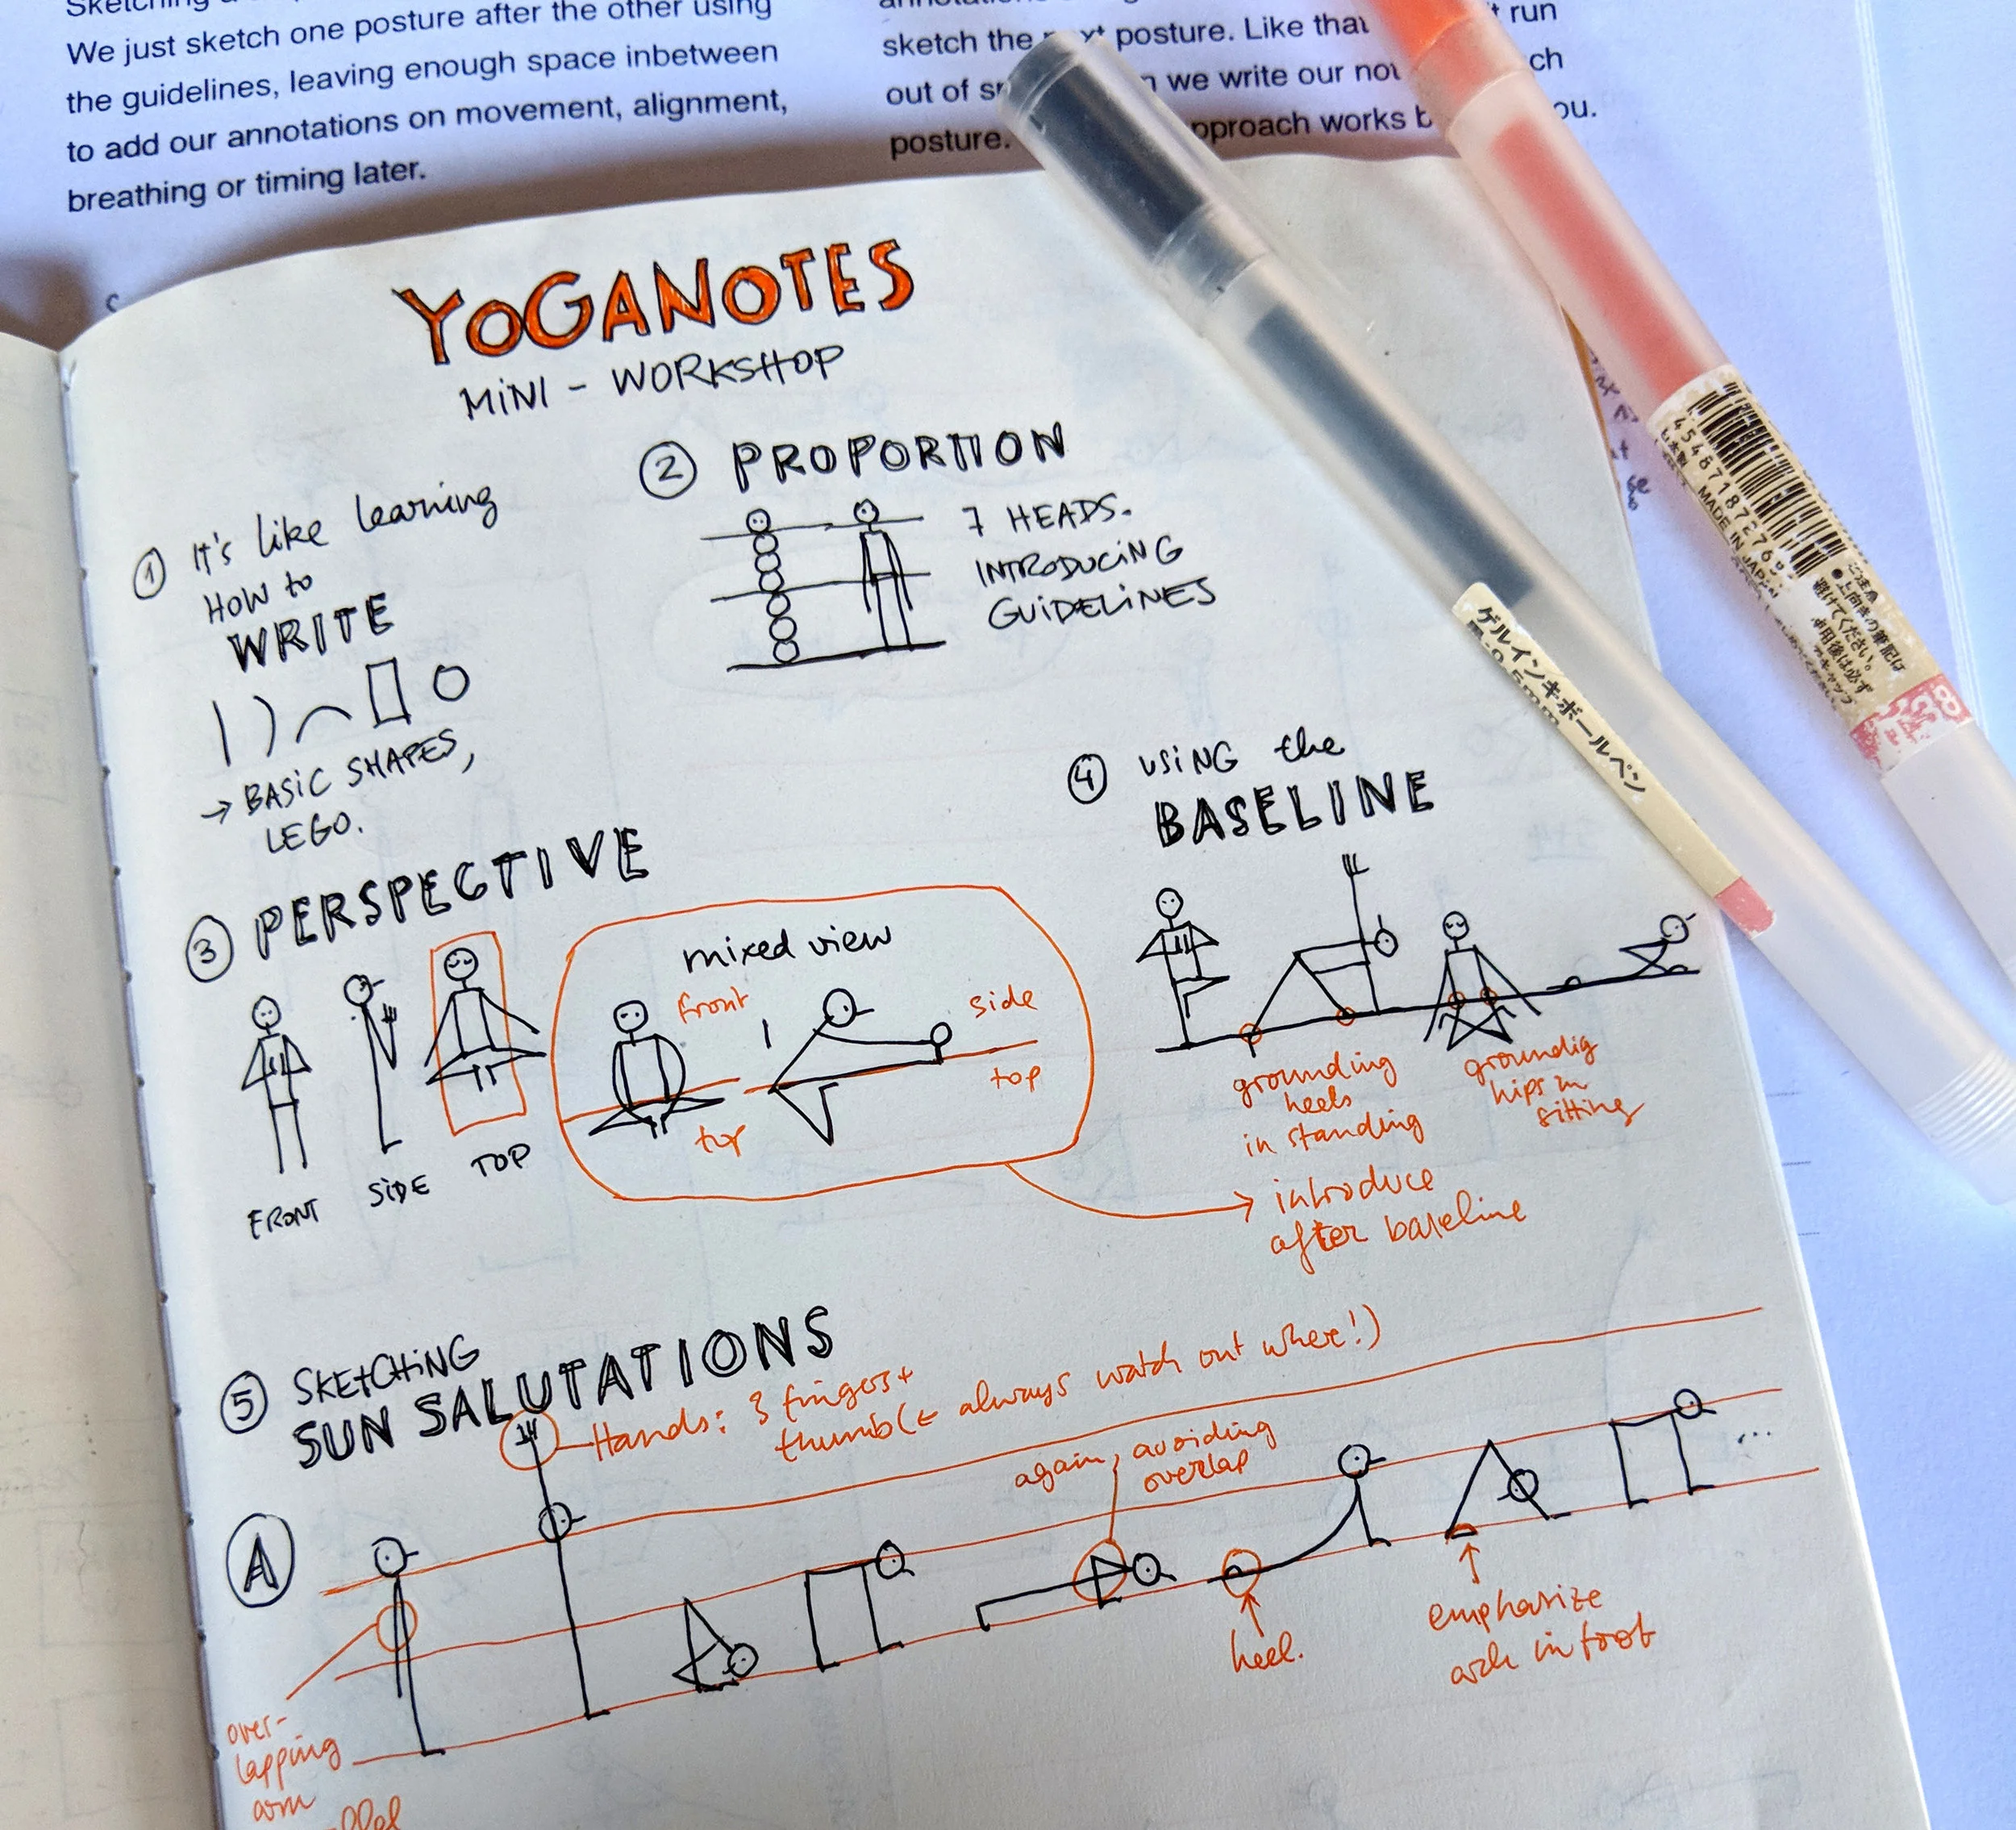
I started to explore how to tackle these difficulties. What could a ‘system’ for yoga stick figures look like? What would the basic principles need to be to make sketching them quickly but also precise? I spent a lot of time in my sketchbook thinking about proportions, perspective, alignment, visual clarity and the typical variations of positioning parts of the body in different yoga postures.
I kept experimenting with my discoveries in the daily sketches of our asana classes. Little by little I developed a system that worked for me and that I was happy with.

Slowly getting to a nice mix of simplicity and clarity
Every now and then during the teacher training, one of the other students would look over my shoulder when I was sketching. They seemed to like my notes and find them helpful. Several of them asked me if they could take photos of my visual notes for their own reference. I was happy to share my notes, but I thought it would be even more useful to teach my fellow students how to sketch sequences themselves, so they could also use this as a tool to plan their own sequences as a teacher.
I sat down with two of the others in a cafe one Sunday and explained the basics of sketching yoga postures. We started simple — with some sun salutations — and then sketched all kinds of other postures: from standing to sitting, from backbends to twists, from hand balances to inversions. We had a lot of fun and I learned a lot from the questions they had and the small things they were struggling with when sketching asanas for the first time.
This afternoon I had the idea to write and illustrate a book that would explain the basic principles and show simple step-by-step drawing instructions for each pose.
I spent the next month and a half writing and illustrating. I assembled a list of over 80 asanas to include in the book and created step-by-step drawing instructions and variations for each pose. I drew the illustrations in Procreate on the iPad Pro using an Apple Pencil.

Sketching on the iPad Pro
Disaster strikes!
When I had finished all writing, illustrations and a good part of the overall book layout, a small disaster took place: My computer got wet and died. At that time we had spent a few weeks in a more remote area without internet and I had not backed up any of the work online (or anywhere else). It. Was. Just. Gone.

Luckily, I still had the basic illustrations on my iPad and the memory of the text I had written fresh in my mind. Nevertheless, I was really upset and angry with myself for a couple of days and feeling quite discouraged about continuing the project at all. If you know me, you might know that writing is not the easiest activity for me. It had felt like quite an achievement to write the theoretical part of the book and I was doubting if I could do it again, if I could get the words out and right a second time. I finally decided to give it a try and spent the next week re-writing the whole text.
As I didn’t have a computer anymore to work on the layout, the project had to go on hold until we were back in Europe. When we got back, I took my old computer to a repair shop to see if any of the data on it could be saved. To my surprise, the hard drive had survived the water incident undamaged. I could retrieve the original text and the layout work I had done on the book so far.
I decided to go through both the original and the re-written text, compare the two versions and take the best passages from each to create the final text. In my memory, the original text had been pretty good. But now that I saw both versions side by side, it was absolutely obvious that the text I had re-written after losing the first version was lightyears better. It was sharper, well structured and flowed much better. I ended up using none of the first version that I had been so sad about losing… Lesson learned: Doing things over really does improve the product.

The final stretch
The rest of the process was time-consuming but pretty straightforward: Proofreading & copy editing, layouting 140 pages, creating an index and filling in some missing illustrations.
I decided to publish the book as a high-quality PDF for people to print themselves. The main part of the book consists of step-by-step drawing instructions for different asanas with space for practicing right on the instruction sheets, which people might be hesitant to do in a book. Self-printed individual pages also allow people to re-order the asana pages in a way that makes sense to them or even to arrange them into sequences when they are planning a class.
After a few months though, I had so many requests for a printed version, that I also created a ‘real book’ which is available as a nice softcover in my shop and that I ship worldwide.

Where to get the book
If you would like to learn more and buy the book, head over to my website: www.yoganotes.net.
Since April 2019 there is also a German language edition of the book that you can find at www.yoganotes.de.
If you have a yoga studio or a shop and would like to sell the book at your place, please get in touch to learn about wholesale discounts and conditions.
Sketch with me!
If you are running a yoga studio and/or teacher training courses and are interested in having me give a sketching workshop for your teachers or students, please get in touch. I am based in Berlin, Germany, but we can also do a remote session via Skype.
My goal for this book is to spread the power of sketching and to enable more yogis to use this wonderful tool to deepen their practice and plan their sequences.
Sketching is a lot like yoga. It is a practice. It is not about being perfect. Everybody can learn and do it. It is a process. And it’s a beautiful journey to embark on.
You should try.
